

Lighting Series
Environment Deep Dive in Octane/C4D
Version 2.0, Updated Mar 2024 using Octane 2023.1.2 and Cinema 4D 2024.3.1
About This Guide
This guide covers Environments - what they are, what they do, and how to use them for lighting and backdrops.
Part I goes over the basics of environments and how Octane handles them.
Part II goes in depth into the types of environments we have at our disposal.
Part III shows how to mix environments for different compositing looks (without AOVs).
Changes from 1.0: This guide used to be called “HDRI Lighting”. It has been fully rewritten, and the scope has been expanded to take a more holistic look at environments in general, including more information on the Daylight rig and what’s going on behind the scenes with how Octane handles projection in environments.
PDF
PDF Version of this guide can be found here
Part I: Environment Basics
An environment can be thought of as an infinitely large sphere that we’re inside of that contains everything in the scene and goes back in space as far as we can see. We can color it, project stuff on it (even though it’s infinitely large, which is weird if you think about it), and rotate it. It can provide global lighting for our scene, things to reflect in our metals and shiny plastics, and basic fog/haze.
There’s one hard and fast rule about environments though: Octane requires one to render anything.
Default Environment
If we don’t provide any other type of environment in the scene, then Octane reverts to the Default Environment.
This is found in the Octane Settings under the Settings tab and Env subtab. It defaults to 90% white, and provides an evenly dispersed whitish light in the scene. We can change that to any color we want by clicking the little white square. This setting is saved with every file, and can be stored in a preset and the default C4D file so it’s the same every time we build a new scene.

If any other type of environment is placed in the scene (and is turned on), it will override the default environment. If the environment we placed is hidden or disabled, Octane will once again revert to the default environment.
Important: Area lights and Emissive materials do NOT contain an environment, so if we’re looking to light a scene using just those, we need to either override the default environment with something else (an empty HDRI environment, for example), or change the default environment to pure black (which is good practice anyway and can be set as a custom default).
Environment Object

If we look in the Objects menu of the Live Viewer, we’ll see an HDRI Environment and a Texture Environment. Both of these are the same thing - a built-in Cinema 4D Sky object with an Octane Environment tag applied to it. Either of these will override the default environment.
The Environment tag is where all the action happens. This tag lets us determine the texture that gets mapped to the environment, controls the power, allows for a medium (essentially fog), and has some rotation controls.
The difference between the two objects in the Object menu (Texture Environment or HDRI Environment) is what is in the Texture input. In fact, the half-circle icons in the Environment Tag’s Main tab lets us toggle between these presets. The light green one on the left turns our tag into a default Texture Environment, the blue one turns it into a default HDRI environment, and the more saturated greenish one on the right inserts a UVW node into the chain which we’ll look at later.
Options and Controls
Power increases the intensity of the light, regardless of what texture is fed in. 1 is default and generally correct in most cases, but if we’re using ACES or AgX tone mapping, we’ll often need to bump this to 1.25 or 1.5 to compensate for the overall darkening that happens with custom tone mapping.
Rot.X and Rot.Y are built in rotation controls for the environment - this can get tricky, and we’ll investigate this more soon.
The environment can cast photons (or not, if we turn it off) if we’re using the Photon Tracing kernel.
Imp. Samp. (Importance Sampling) should be kept on nearly all of the time unless we’re troubleshooting - this is similar to Adaptive Sampling where it puts more effort into trickier areas.
Type is used to determine whether this particular environment should control the lighting, be visible, or both. It’s mostly used for compositing two different environments together.
The Medium tab controls fog/haze in the environment via a medium (typically Scattering), and the Exclusion tab lets us include or exclude specific objects from the effects of the Environment’s light.
Rotation

If the environment truly was just a big sphere, then as we moved around inside of it the objects in the texture would get larger and smaller and distort when viewed from different angles since they aren’t actually 3D. The illusion of using an image for a backdrop only works if we have the same vantage point as the camera did when the image was shot or generated. We can look around 360 degrees and the effect will hold, but we can’t move within it because, again, it’s 2D. Octane compensates for this by moving the environment around with us so no matter how much we move, we never change distance from it.
We also can’t (well, shouldn’t) make the image larger or smaller if realism is the goal. The camera only captures so much data, and it only looks physically correct if the sphere is the right size so the objects in it appear to be at real world scale. If we try to enlarge or shrink the texture, not only will the objects in the image distort, but we’ll either get weird tiling if we shrink it or the seam will break if we enlarge it.
We can, however, change the focal length of the camera, which will change the optical properties of the lens to show more or less of the environment (and 3D objects), similar to swapping a real life lens on a camera. The same distortion happens as it does when messing with optics in the real world.
Rotation
C4D’s Sky object works like a giant sphere in that we can rotate around us. If we were using the Standard or Physical render engine and put an HDRI on a Sky and rotated it on any axis, the texture wouldn’t distort and it would give a similar effect to rotating the camera around.
Important: Octane does NOT work like this - it has no concept of rotation (!!).
Instead, it treats the environment like a fixed object and spherically maps a texture to it. The Octane Environment tag does have Rot.X and Rot.Y controls, but again, it does not rotate the environment. What it’s really doing is offsetting the texture on X and Y. Because of the spherical mapping, Rot.X works as expected - it just slides the texture along the equator of the sphere so it looks like we’re on a turntable.
Rot.Y is the real problem here. Spherical mapping has pinch points at the top and bottom poles of the sphere. These are taken into account with equirectangular projection (which is why HDRI images look so weird when they’re flat). When we offset an image Y on our sphere, because it’s not rotating, but sliding the image up and down, the pinch points change and everything starts to look like we’re in a fun house or someone slipped something in our drink at a rave. There’s no Rot.Z (tilting our heads like a confused puppy) because there’s no corresponding offset that works like that. In general, what we want to do is rotate the camera, not the environment if we need to see different parts of it or dutch the angle.
Tone Mapping

Tone mapping is especially important with HDRI lighting if we’re wanting to view the image in the background. This has to do with an HDRI having values that our monitors can’t display. The standard tone mapping method (which is no tone mapping), will clip off high values and tend to blow out bright parts of the HDRI. ACES or AgX tone mapping will fix this. More on this in this guide.
Node Editor

It’s helpful to take a look behind the scenes a bit and see how Environments are constructed to understand the different types. There’s a button at the very bottom of the Attributes Manager (any tab, as long as the tag is selected) that has four squares, two of which are connected by a bendy wire. This launches the Node Editor and loads in the Environment so we can see what’s going on. It’s also the best way to do complex setups so we don’t have to keep diving up and down levels in the Attributes Manager. The Environment node has two ports - Texture is for procedural or image textures, and Medium is for a scattering medium (fog, basically).
The Texture Environment preset (or object from the LV menu) loads an RGB Spectrum texture into the Texture field. This is just a single color that we can choose, and it changes the environment from the inside of a giant white glowy white sphere to a giant whatever-color-we want glowy sphere.
The HDRI Environment preset loads in an Image Texture node and connects that to the Texture environment. This particular Image Texture is set up a little differently than a stock one that we add ourselves. We’ll also look at why this is in the next section.
The UVW shortcut just adds a UVW Transform node which we’ll also look at soon.
Part II: Environment Types
HDRI Environment

The main concept behind HDRI (or image-based) lighting is that we take a photograph or image that was captured or generated in High Dynamic Range, and use that as both a light source in the scene and a way to introduce reflections into our shiny materials. We can also use it as a visible backplate, but that only works in some situations. HDRIs that are photographs (and not generated studios, for instance) lend realistic reflections to our scene. Generated ones are better for even studio lighting and special effects.
While the setup itself is straightforward, there are a lot of factors that go into doing this right. Let’s have a look at the important ones.
File Type and Color Space

First off, we shouldn’t just use any old image. Technically, we can feed whatever JPG or PNG we have laying around in our camera roll, but they won’t work anywhere near as well as a proper HDRI image. Images meant for HDRIs are captured or created in 360°, using equirectangular projection, and saved as linear EXR or HDR files. This creates a seamless (because 360°) image distorted to conform to a rectangle. It looks weird when viewed flat, but maps properly and seamlessly to the inside of a sphere. Octane uses the high dynamic range of these files to produces better and more realistic lighting.
Using a PNG or JPEG causes us to lose pretty much all of the advantages of an HDRI. The lighting ends up looking flatter, and there’s distortion and other artifacts that occur when viewing it as a backdrop in the render. It’s ok in a pinch if we just need a splash of color or some random stuff in the reflections and are going to composite out the background anyway, but it’s generally not good practice.
Resolution

When we’re on the hunt for HDRIs, we’re often presented with several resolution options. Because of the large file sizes, this could end up having an impact on our render times and VRAM.
If we don’t have perfectly smooth glossy materials that need sharp reflections, and we don’t need to see the background, 1K will actually work fine. In most cases, a 4K is a good all-arounder: This is large enough to give us relatively sharp reflections in our shiny materials, and the background is sharp-ish, so if we have a bit of Depth of Field or enough stuff to fill the frame, it doesn’t matter. A 4K only eats 128MB of VRAM, which we can handle, and doesn’t add significant load time.
Now if we grab an 8K version of the same HDRI, our reflections get a bit sharper and the background gets considerably sharper, but suddenly we’re looking at 512MB (half a gig) of VRAM. Maybe it’s worth it, but that’s a big commitment for a single texture. A 16K will use 2GB of VRAM and start impacting pre-render times significantly. That’s only worth it if we have a large render (4K or higher) that prominently features the HDRI as a backdrop. More about textures and VRAM can be found in this guide.
The Image Texture node

This Image Texture node is set up a little differently than the stock one that we pull in ourselves. Because the textures are high bit depth, linear files, the Color Space dropdown in the Image Texture node MUST be set to Linear sRGB+legacy gamma, with a gamma of 1 for it to work properly. The HDRI Environment object that we get from the Objects menu in the Live Viewer already has this set properly.
Important: We don’t want to replace the Image Texture with the image directly (which, unfortunately, is too easy to do using the Attributes manager). As long as we remember to click the Image Texture bar, and not the folder or dropdown icon, and then put our HDRI in the File Field inside the Image Texture node/shader, we’ll be fine. If we replace it, it will use a C4D bitmap shader which will put us in a world of hurt.
Color Correction and Other Mods - UVW Transform to the Rescue!

Let’s say we want some nice reflections in our scene, but don’t want the color cast a particular environment is giving all our objects. The best way to handle this is to desaturate it with a Color Correction node. The problem is, as soon as we hook up a Color Correction (or any node that doesn’t have Transform and Projection ports), our rotation (which we now know is really an offset) breaks and puts the texture back to 0/0. No matter how much we rotate the scene either with our Rot.X and Rot.Y or physically sling the Sky object around, the texture won’t budge.
This is where the new UVW shortcut comes into play. This is the saturated green half-circle icon in the Main tab of the Texture tag. All this does is place a UVW Projection node between the last texture in the chain and the Texture input of the environment. Just like magic, all our rotation works again.
Texture Environment

This one is fairly straightforward. The RGB Spectrum node lets us generate a single, solid color. If we want it to look like we’re in a pink or a blue globe, we can just tint the light. We can increase/decrease the intensity with the Power slider in the tag, and - like all emission - that will change the saturation as well (and sometimes the hue if we’re using ACES tone mapping).
Fun fact - the default color in the RGB Spectrum has a Value of 90.6332 because it was originally set using Octane’s linear RGB picker at R:0.8/G:0.8/B:0.8. This converts to H=0, S=0, V=90.6332% when we’re using C4D’s nonlinear picker with the HSV color model.
We can swap the RGB Spectrum out with anything we want - let’s have a look.
Procedural Textures
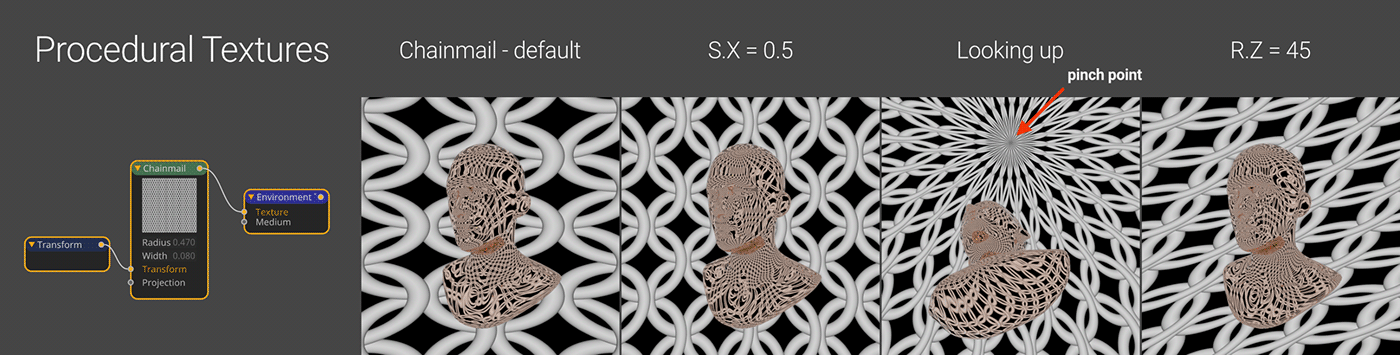
Most procedural textures are easy to hook up, and they’ll work appropriately. If we attach a Chainmail generator to the texture input like in the example above, the sky will look like chain mail. We can rotate this around with Rot.X and Rot.Y, or play with R.H and R.P in the Sky object itself just like an HDRI, and run into the same issues with Rot.Y that we did with the HDRI. When we have a geometric pattern like this in our environment and look up, we can see the pinch point issue pretty clearly.
Most procedurally generated textures are in a 1:1 aspect ratio, and the sky texture is still expecting 2:1, so it’s probably a good thing to add a Transform node to whatever texture we’re using and set the S.X value to 0.5 (after unchecking Lock Aspect Ratio) so it’s not stretched.
Gradients

Using a gradient as an environment gets a little tricky. There are a few things standing in our way here.
Important: First off, the Magenta-colored Octane Gradient node is NOT a generator. It’s meant to remap values, not create color data. If we try running this directly into the Environment, it’s not going to work out too well for us as we can see above. That’s a rainbow gradient, but we’re only seeing green.
The Gradient Generator (blue node buried in the Custom Texture section of the list on the left) is currently the best way to create gradient pixel data. The easiest way to get this node in the editor is to search in the node editor (use the filter box or hit space bar in the node editor and type “Grad”).
The Gradient Generator is set to a gamma of 2.2. This will produce a black-to-white ramp that looks right to our eyes if it’s used directly, but if we feed it into an Octane gradient, the recoloring will not work as expected because of color space mismatches and other shenanigans. If we want to recolor the Gradient Generator, then we want to set its gamma to 1.
The Octane Gradient now allows us to change its interpolation color space. We can try switching its color space (cspace) from Linear to Perceptual (which should really be called sRGB) to get a smoother blend. This is also going to depend heavily on the tone mapping used and the intensity of the light. If we play around with a few of these settings, we should find something that looks good.

We can rotate a linear gradient by using the Transform node’s R.Z value. That gives us diagonal (yet spherically distorted) gradations. When we hit 90 degrees we’ll get left-to-right stripes that form rings as it gets to the poles rather than up-to-down stripes that converge at the poles.
We can change the projection of our textures, which can give us different effects. One of the newer projection types: Sample pos. to UV is fantastic for making flat-on texture backgrounds if we use it as a visible environment. Using it as a primary isn’t so great though, since it produces weird results, so we’ll just want a similar texture set to MeshUV in our Primary Environment so it looks right.
Medium

We can run a scattering medium into our primary environment pretty easily using the Add Fog button in the Medium tab. Mediums in visible environments get ignored. Basically we add in the fog with the button, choose a color for it by clicking the white box, and then use the Medium Radius to control how thick it is.
Important: the key to get really nice foggy-looking fog is to put an RGB Spectrum into the Absorption field and play with both that and the scattering color, as well as the density (in small increments), medium radius, phase, and the environment’s power.
Volumetrics is a complex topic, though, so for more advanced stuff, be sure to check out the Volumetrics guide.
Octane Daylight Rig

The Octane Daylight Rig is located in the Live Viewer under Object>Lights. uses a standard C4D Infinite Light and Sun Expression, and adds an Octane Daylight tag to it. This rig contains an environment, so it overrides the default environment and allows for a fog medium. It also contains a light (the sun).
Important: The Imp. Samp. (Importance Sampling) checkbox is OFF by default in the C4D implementation of Octane. To be in line with the Standalone recommendations, this should actually be turned ON.
Rotation

To rotate the rig, we need to change the R.H and R.P coordinates in the C4D Infinite Light object (not the Octane Daylight tag). If we zero out all of the camera coordinates, our vantage point is exactly at ground level facing due West, and the sun will be on the eastern horizon at our backs. If we rotate the C4D Infinite Light object 180 degrees on R.H, we’ll be facing due East staring into the sun.
As we start incrementing the Infinite Light’s R.P coordinate into negative values, the sun will start rising. By -90, the sun will be fully overhead. At -180, the sun will be on the western horizon.Any R.P value from 0 to 180, or -180 to -360 will be various states of sunset and night.
Important: The C4D Sun Expression tag on the rig starts off disabled so that we can manually rotate the light. If we’d rather choose a particular city/date/time, we can go into the expression’s Basic tab and check Enable. This fully takes control of rotation, so we can’t tweak the values until we disable it again.
There’s a North Offset control in the Daylight tag which lets us offset the environment (similar to R.H). This is particularly useful if we want the Sun Expression to control the time of day (and therefore all the rotation values), but we’d rather be facing a different way without having to move the camera.
Models
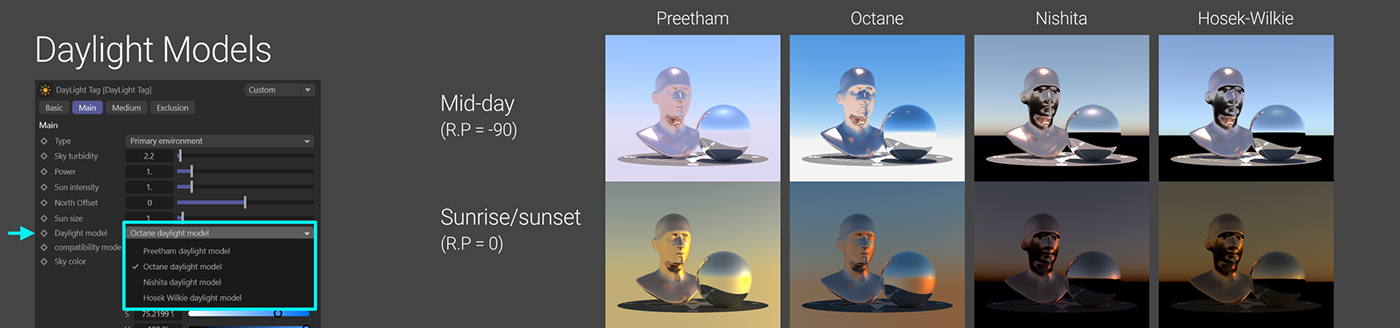
The Daylight rig has four models, each that give a different look. Different controls in the Main tab either work or don’t work depending on the model (Sun Size and Ground, for example). From the manual:
Octane Daylight - This is the new default daylight model that simulates full-spectrum daylight, providing more sky color variation as the sun moves along and bearing shorter rays as the sun moves closer to the normal plane.
Preetham Daylight - This is the old daylight model that lights a scene with basic spectral radiance as the sun moves over the horizon at a relative distance from the object.
Nishita Daylight - Implements atmospheric scattering based on the Nishita sky model and displays the color variations, which are optical effects caused by the particles in the atmosphere.
Hosek Wilkie Daylight - Produces more realistic and detailed results than other implementations specially in hazy conditions and near the horizon.
Ground/Sky

The different models treat the ground in different ways. There’s a GROUND category at the bottom of the Main tab of the Octane tab that’s rolled up by default. If we expand it, we’ll see a color and some controls.
All of the controls from the top of the section down to the Daylight Model dropdown (Turbidity, Power, Intensity, etc.) work with all the models.
Preetham disregards all of the color controls and only uses spectral values that we can’t access. The ground is just an infinite extension of the sky color. Octane uses all the controls (note: ground angle and blend need to be set really low to see the ground, otherwise it’s also infinite sky). Nishita and Hosek-Wilkie allow us to change the ground color, but not the sun or sky. Ground start angle and blend angle only work with the Octane model, not Nishita or Hosek-Wilkie.
Part III: Mixing Environments
Primary/Visible

Octane has two designations for an Environment: Primary or Visible. This can be set in the Type dropdown available in the Environment’s Main tab. Primary controls the lighting in the scene, Visible is what we’re actually seeing in the background.
This is typically used when we want to light the scene with an HDRI, but want a solid color or gradient or something else in the background rather than see the HDRI itself. All we need to do in this case is put two Environments in the scene, set the type of one to Primary, and the other to Visible. It’s a good idea to rename the Environments so we know which one to alter at a glance.

In newer versions of Octane we have a few more compositing options in the Visible Environment section that appears when we set the type to Visible. We can decide whether we want to see the backplate, or if the visible environment shows up in reflections and refractions.
We can have several Environments in a scene, and have them all turned on, but Octane only recognizes one Primary and one Visible Environment. In the case where there are several of each type, the TOP one of each type in the Object manager will be the active one. The others below it will be disabled in Octane’s eyes, and also won’t use any additional VRAM, which is nice, so we can just have a stack of environments and move them up and down to audition them.
Mixing a Daylight Rig
Important: Daylight rigs can ONLY be used as Primary environments. Setting an Octane Daylight rig to Visible is a bad idea. Not only does it not show up as visible, it also breaks the whole Visible environment thing, so if a Texture or HDRI environment is also set to Visible, we’re still only going to see the Primary environment in the background. Don’t do this.
We now have two options for combining a Daylight rig with an HDRI.

The best way is to use Daylight for the Primary and an HDRI Environment as a Visible Environment. The advantage to this setup is that we get a realistic color cast to the light depending on the time of day (to a point - we’ll want a sunrise/sunset HDRI if we’re aiming for those times, or maybe color correct the HDRI) and can control the shadows better using a Daylight rig. Poly Haven has a good collection of pure sky HDRIs for this.
Important: We need to align the HDRI sun with the physical sun, or the scene will look weird.

The Daylight tag also has an option for Mix Sky Texture. This mixes the Daylight rig with an HDRI or Texture Environment that’s also set to be a Primary environment. This is an older method that presents some problems, even when the suns are aligned. Both the HDRI sun and the Physical sun are visible and cast shadows, making it look like we’re on Tatooine. There are also issues with caustics when doing the mix this way.
Wrap Up
Hopefully you’re more comfortable with the concept of environments in Octane. Check out some of the other guides here to learn more about other aspects of lighting, and Octane in general.
Author Notes
OG004 Environmental Lighting Version 2.0, Updated Mar 2024 using Octane 2023.1.2 and Cinema 4D 2024.3.1
Changes from 1.0: Full rewrite.
This guide originally appeared on https://be.net/scottbenson and https://help.otoy.com/hc/en-us/articles/212549326-OctaneRender-for-CINEMA-4D-Cheatsheet
All rights reserved.
The written guide may be distributed freely and can be used for personal or professional training, but not modified or sold. The assets distributed within this guide are either generated specifically for this guide and released as cc0, or sourced from cc0 sites, so they may be used for any reason, personal or commercial.


